
| Strategi Website Creation and Maintenance |
| Product: | Strategi | |
| Modified Date: |
|
Creating Web Sites with Strategi and Strategi's Webmaster 1. Downloading, Installing, and Using Strategi Webmaster. Strategi's Webmaster is a utility that is included with your Strategi software package. When installed on a PC, Webmaster will greatly aid in the managing and modification of web site contents. When executed, Webmaster will connect directly to the Strategi Web server and synchronize the directory content of the Web server and the remote PC. The Download and Installation of Webmaster: Before you can download the software, the following prerequisites must be met. STEPS:
Getting Started with Webmaster: To start working with Webmaster under normal circumstances, you can do one of two things.
Check in and Check out: The check in and check out process is the backbone to the Webmaster software. The check in and check out process makes a connection between the Strategi Web server and the remote PC that synchronizes each sources directory contents. Check Out: To check out a zone from the Strategi Web server, you need to interact with a Zone (see Section 3, Zones). All zones that you have access to will be listed in the drop down box next to the title "Name". Select which zone you wish to check out the web site content of, then simply click on the Checkout button on the bottom of the window. The web site contents will then be transferred to the remote PC into the "web sites" folder (default C:\websites). When the contents are transferred, you may begin to modify them by opening up the files that are now in your website folder. Webmaster also keeps track of who is currently using a zone through check out, so as to prevent a second person from checking out the same zone. Check In: The checking in of a zone is also a simple process. Simply click the "check in" button at the bottom of the Strategi Webmaster window, and all added and modified files in the checked out zone will be transferred onto the Strategi Web server. All old files on the server will be over written by the new files that are transferred in, so you may wish to make a back up of your old files just in case. After the initial check in, all subsequent check ins can be made using the refresh button. By using refresh, Webmaster will only re-check in those files which have been modified, or any new files which have been added. This prevents needless re-processing of files. Warning: The Check In/Check out processes are permanent. All files in the default C:\websites directory will be deleted and replaced by any newly checked out files. The same thing occurs on the Web server with newly checked in files as well. Make sure that what you are checking out or checking in is complete, so you won't delete any critical files. Webmaster zones should also only be used by a single user at a time. This will prevent one person's work from being over-written by another persons, since the last check in of web sites will over write any precious entries, hence one person's work being destroyed by another's. 2. Web sites: Creating and Maintaining your SGI Web sites Strategi web sites aren't what you would typically consider a web site. An internet web site is a URL web address that sends HTML information to your computer, and your browser in turn processes the code and displays the information that was transferred to your computer. A Strategi web site is similar to the popular web site idea, in that by defining one you can add the code that the internet user may access. However, Strategi web sites define URLs, so the actual locations of the information gets defined. Thus, by a very simple process through the use of Strategi, you can create a multi-dimensional web system through the use of an iSeries 400. On top of that, you can even define the level security for each site individually. Information is added to the defined sites by placing code into Strategi Zones, which are explained in section 3 of this document below. Creation of web sites and web site modifying: You can begin directly working with web sites by selecting option #5 on the Strategi main menu. By using the menu, you will have most of the web site modification utilities listed and at your disposal. You can always, however, use the command line functions in place of using the menus if that is what you prefer (e.g. Use command line CRTSGIWEB in place of the menu option F6). Commands that are presented on the menu include (command line functions in parentheses): Creating a site is simple. Hit the F6 button while on the Strategi Web Sites Screen. You will need to fill out the following information: If there are any more questions about this display, consult the Administration Manual Chapter 5: Using Strategi's Features on the iSeries 400, or hit F13 (shift-F1) for "How to use this Display". Changing a web site (CHGSGIWEB) is option 2. The Changing Web Sites menu presents the same screen as the creation process, with the existing entries inserted. Modify these accordingly. Aliasing: Aliasing is a useful tool in web site design. By placing an alias on a web site, you can re-direct an internet user from one of your sites to another one, even though they attempted to access the first one. This is very helpful, for example, if you need to perform maintenance on one site, but still want a user to get information by entering that site name. This is also useful if you have moved information to a new page, and many users are accustomed to entering an old address. It is always a good idea to place an alias on a site if any wide scale maintenance is going to be preformed and you don't want your customers or users to hit a dead link. You can create an alias by using the CRTSGIALS command, or by placing a 22 next to the web site you wish to alias (which is the command "Work with Aliases"), then hitting F6 to create a new alias. You can modify an existing alias by using the command CHGSGIALS, or by placing a 2 next to the alias to be modified in the "Work with Aliases" menu. Enable an alias by entering *ENABLED on the status line, disable the alias by placing *DISABLED on the status line. Other alias commands are delete alias (DLTSGIALS), retrieve alias (RTVSGIALS), and display alias (DSPSGIALS). The following are SGI commands that directly relate to web site creation and maintenance. Enter any of these commands from the Strategi menu command line. Additional information is provided in the Strategi Administrators manual, Chapter 6: Command Line Functions. CHGSGIALS (Change Web site Alias): Use to modify an existing alias on a web site. CHGSGIWEB (Change Web site): Allows modifications of existing web sites. CPYURLSGI (Copy URL to Web site): Copies the entirety of an existing URL's web site code to one of your SGI web sites. CRTSGIALS (Create Web site Alias): Creates a new alias for an existing site. CRTSGIWEB (Create Web site): Creates a brand new web site on the web server. DLTSGIALS (Delete Web site Alias): Removes an alias from a web site. DLTSGIWEB (Delete Web site): Removes a web site from the Strategi Web server. DSPSGIALS (Display Web site Alias): Display the alias that is assigned to a particular web site. DSPSGIWEB (Display Web site): Shows details about an existing web site. RTVSGIALS (Retrieve Alias): Retrieves the information about an alias, allowing alias modification. RTVSGIWEB (Retrieve Web site): Retrieves web site information, allowing modification. WRKSGIWEB (Work with Web sites): Allows modification of values on a particular SGI web site. 3. Zones: Setting up Zones, and SGI Zone Commands for Maintenance For the purpose of this document, zones will be described in terms of web site information. A Strategi Zone is merely a logical labeling of a section of the iSeries 400 file system. By placing information into a zone which has been linked to a web site, a user can can actually link their code to the internet through the IP address defined by a Strategi Web Site on the iSeries 400. After defining a zone, you will want to work with zone authorities. The authorities of a zone specifies who can make changes to zones, or see zone information. You can set authorities so a user can only see the zone information, so they can only modify the information, or to so they can do both. By adding a person to the zone authority list, they will be able to use Strategi Webmaster to check out and check in web site information so as to make webpage modifications. Creation and Modification of Zones: You can work with zones by placing a 12 next to a web site name in the "Work with Strategi Web Sites" menu, or by entering one of the zone commands on the command line. The options presented on the "Work With Web Site Zones" screen are (Command line function equivalents in parentheses): To create a zone, hit F6 or enter CRTSGIZON. You will need to fill out the following information:
If there are any more questions about this display, hit F13 for "How to use this Display". Zone modifications (CHGSGIZON, menu option2) presents a screen of options that is the same as the Create Zone screen; simply modify the existing values as desired. All other zone specific actions are modifications to those created by making the zone, so their purpose is already defined above. Working With Authorities: After setting up a zone, you can begin to work with zone authorities. Zone authorities are used to define which users have access to zones, and what contents each user can read and modify. Thus, authorities define user privileges to zone contents. The following options are made possible by entering a 12 next to the zone code in the "Work with Web Site Zones" menu, which is the menu option for "Work with Authorities" (The command line function WRKSGIZNA can bring you to the same screen): The other authority option that can be performed, even though it isn't presented on the menu screen, is Retrieve Zone. By entering RTVSGIZON on the command line, you will be presented with specific parameter values associated with a specified zone. The Following are SGI commands that directly relate to Zone creation and maintenance. Enter any of these commands from the Strategi menu command line. Additional information is provided in the Strategi Administrators manual, Chapter 6: Command Line Functions. ADDSGIZNA (Add Zone Authority): Used to add a user who has the authority to use a particular zone. CHGSGIZNA (Change Zone Authority): Modifies a specific users access to a zone. CRTSGIZON (Create Zone): Defines new zones, and specifies its security properties. DLTSGIZON (Delete Zone): Deletes a particular zone. DSPSGIZNA (Display Zone Authority): Display information about authority on a specific zone. DSPSGIZON (Display Zone): Display zone information based on type, domain, and Zone code. RMVSGIZNA (Remove Zone Authority): Remove a user's access to a single zone. RTVSGIZNA (Retrieve Zone Authority): Shows a users level of zone authority, and ability to work with a zone. RTVSGIZON (Retrieve Zone): Gets zone information values for a Strategi Web site, which are specific to each parameter presented. WRKSGIZNA (Work with Zone Authority): Use to specify who can view or work with a zone, and their authority level. WRKSGIZON (Work with Zones): Use to specify a zone type, either *IFS or *WEBSITE. 4. A Web Page Creation Walk-Through. This walk-through assumes that you have already successfully installed Webmaster. Also, command will be used as opposed to menus. The first thing that needs to happen is a web site must be created. Log into Strategi and type in CRTSGIWEB on the command line. 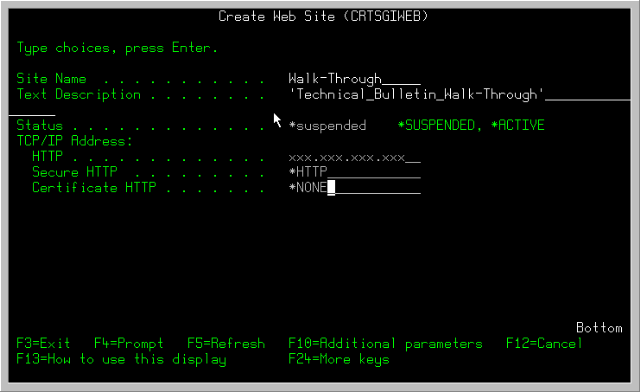
Note that the description is enclosed in apostrophes and that the http line should have a valid IP address as opposed to x's. After you have created your website, you need to create a web site zone that handles the web site's information. Type in CRTZGIZON and the Create Zone screen will appear. An example of what information to fill in is: 
The type is *Website because we are working with web sites. You can specify a subdirectory from the default website, and create multiple zones for a single web site. Also you should modify the default user authority to your preference. You will now want to work with authorities. By modifying authority information, you can add users who can check out zone information when using Webmaster. Work with zone authorities by using the command WRKSGIZNA. This screen appears. 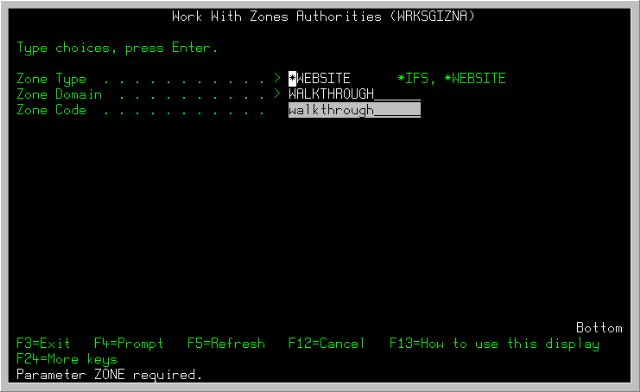
Enter the zone type as *website, the Zone Domain will be the web site domain for the zone (Walkthrough in our example), and the Zone Code which you entered when creating the zone (Also WalkThrough for our example). On the next screen, hit F6 to add a user to the zone authorities list. 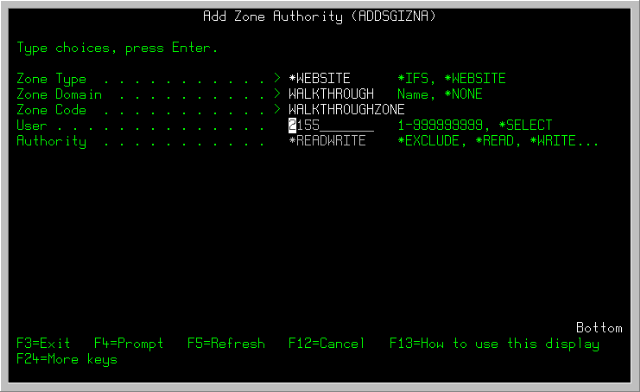
Enter the Strategi user number of the user you wish to give zone authority for (Our walkthrough user 2155 is called WTUser), and specify what authority that user should have. The result will be the user being added to the zone authorities list. 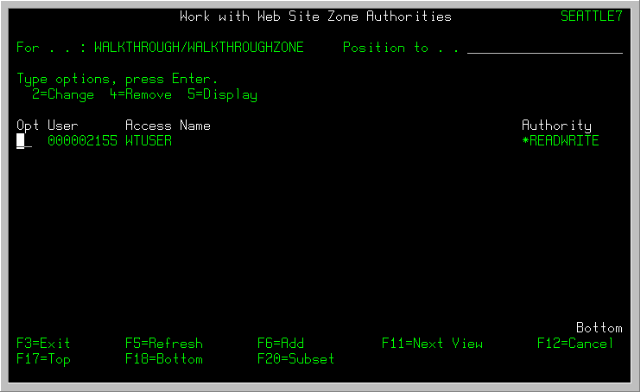
Now that we have a web site and a zone created with a user who has authority to work with a zone, we can begin to work with Webmaster. The zone that the walkthough will follow will be different then the one that we created above because we did not specify a valid IP address that works with a current Strategi Webmaster configuration. The zone we are now going to use is called Z_Tom. 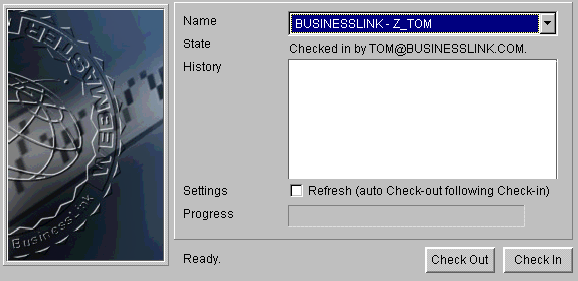
Highlight the name of the zone you would like to modify and click check out. 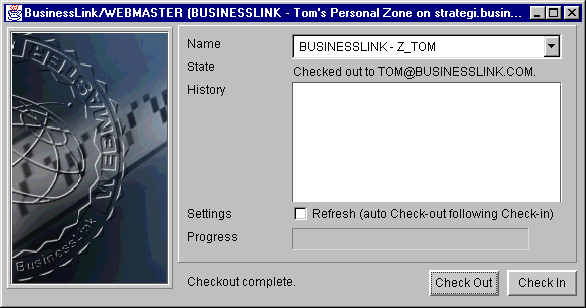
Note the state line reads that it has been checked out to a user. The check out results in all of the files in the checked out zone being placed into your C:\websites folder (or your specified 'websites' folder). Anything that you modify and place into your 'websites' folder will be placed back into the zone once you check it back in. Let's as an example, place an image and a web page into our 'websites' folder. 
As an example, the image 'WalkThroughImage' and the web page 'WalkThroughHTML' have been added to the 'websites' folder. By adding these files, they will be added to the zone, as well as any changes that have made to the old information within the checked out files. The results of these modifications to the 'websites' folder will completely replace ALL old zone information, so make sure you have not removed anything important for your web page. 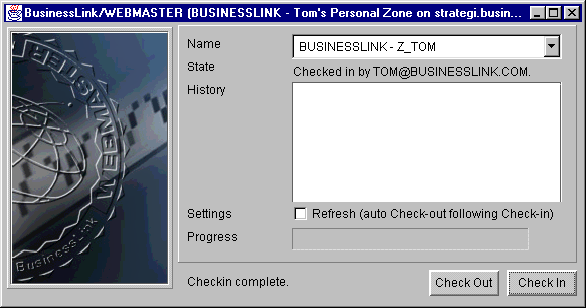
Webmaster also will note the last person to check in a zone, as shown by the state line here after check in. End of Walk-Through 5. Recommended PC HTML editors. You may also wish to invest in one of these more advanced editors. If you do not wish to purchase an editor, we recommend using the Windows Notepad software. It allows type conversions, and it comes free and installed on all Win95 and later Microsoft OSes. **End of Technical Support Bulletin** |
|
|